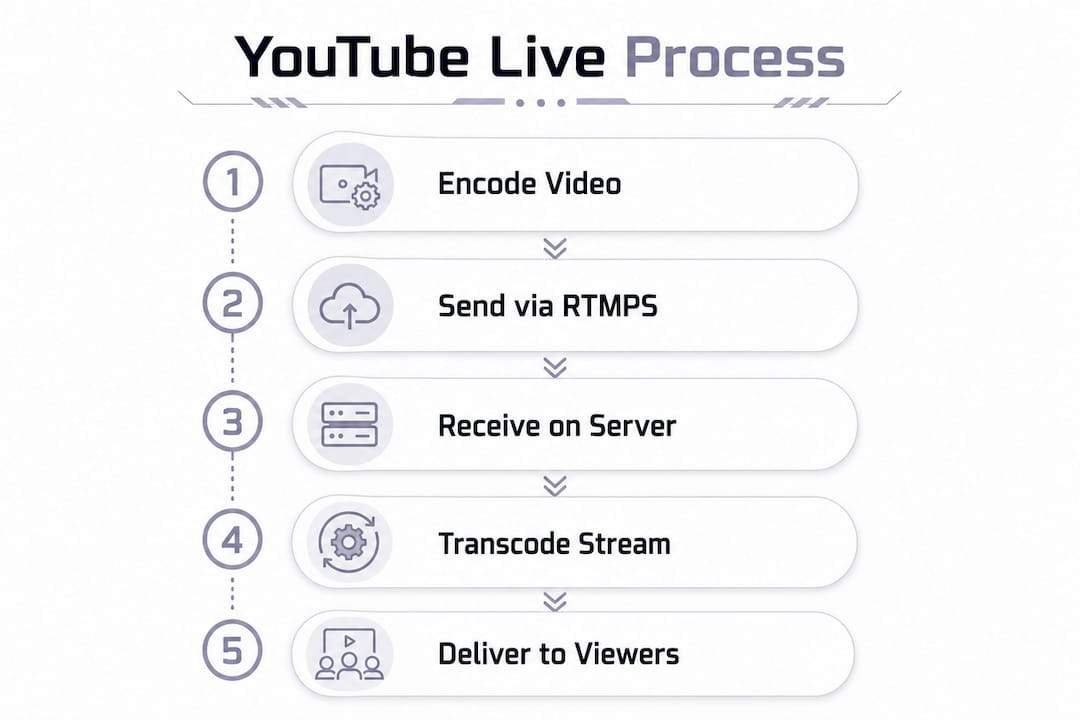
YouTube live streaming is the process where your video is encoded and sent via RTMPS to YouTube's ingest servers, which then transcode and distribute it to viewers in real time. If you're an aspiring creator or gamer trying to figure out how YouTube live streaming works, the technical side can feel like a lot at first. But once you understand the core workflow, from your encoder to YouTube's content delivery network (CDN), everything clicks into place. This guide covers the full picture: protocols, eligibility, latency modes, streaming software like OBS and Streamlabs, and how to keep your stream healthy.
How does YouTube live streaming work technically?
YouTube Live uses the RTMPS protocol (secure RTMP over TLS) to receive your stream. Your encoder sends video data to a YouTube ingest server, and RTMPS encrypts the connection to prevent man-in-the-middle attacks during broadcast. The primary ingest endpoint is rtmps://a.rtmps.youtube.com/live2. A plain RTMP endpoint also exists at rtmp://a.rtmp.youtube.com/live2, but YouTube recommends RTMPS for all new setups.
Every stream requires two things: a stream URL and a unique stream key. The stream key is what authorizes your broadcast on your specific channel. Treat your stream key like a password. If it leaks, someone else can broadcast on your channel. Rotate it immediately if you suspect it has been compromised.

Codecs and encoder settings YouTube requires
YouTube's ingest servers expect specific technical settings. Get these wrong and your stream may be rejected or look broken to viewers.
- Video codec: H.264
- Audio codec: AAC
- Keyframe interval: 2 seconds
- Bitrate mode: Constant Bitrate (CBR), not Variable Bitrate (VBR)
H.264 and AAC requirements are non-negotiable. CBR is preferred because it keeps your data rate predictable, which helps YouTube's ingest servers buffer your stream without hiccups. VBR can cause sudden spikes that destabilize the connection.
Pro Tip: Set your keyframe interval to exactly 2 seconds in OBS or Streamlabs before going live. This single setting prevents more stream rejections than almost any other encoder adjustment.
Once YouTube receives your stream, it transcodes it into multiple quality levels and pushes those to its CDN. Viewers around the world pull from the CDN closest to them, which is why your upload location matters less than your upload stability.
What are the requirements to go live on YouTube?
Not every channel can go live immediately. YouTube has a set of eligibility gates you need to clear first.
- Verify your channel. Go to youtube.com/verify and complete phone verification. Without this, live streaming is locked.
- Wait up to 24 hours. First-time live stream activation can take up to 24 hours after you enable it. Plan ahead before your first broadcast.
- Meet the mobile subscriber threshold. Mobile live streaming requires at least 50 subscribers. Desktop streaming has no subscriber minimum.
- Be at least 16 years old. YouTube enforces an age requirement for live streaming access.
- Avoid live streaming restrictions. If your channel has received a live streaming restriction in the past 90 days, access is blocked until the restriction lifts.
Desktop streaming is the recommended starting point for new creators. It skips the subscriber gate entirely and gives you more control over your setup. Mobile is convenient, but the eligibility barriers make it a poor choice if you're just getting started.
The 24-hour wait catches a lot of new streamers off guard. If you plan to go live on a specific date, enable live streaming at least a day before. There is no way to speed up the activation window.
What is latency on YouTube Live and why does it matter?
Latency is the delay between what happens in front of your camera and when viewers see it on screen. For gaming streams and interactive content, this gap directly affects how well you can respond to your audience.
YouTube Live latency typically runs 6–30 seconds from encoder to viewer. That range is wide because two factors stack on top of each other: the encoder-to-server ingest delay (roughly 2–5 seconds) and YouTube's own buffering. Ultra-low latency mode can bring total delay down to approximately 3–5 seconds.
| Latency mode | Typical delay | Best use case |
|---|---|---|
| Normal | 20–30 seconds | Pre-recorded style, VOD-like content |
| Low latency | 6–15 seconds | General streaming, casual chat interaction |
| Ultra-low latency | 3–5 seconds | Gaming, live Q&A, real-time interaction |
Choosing ultra-low latency is not always the right call. Pushing ultra-low latency without stable upload increases dropped frames and degrades quality. Your network and encoder both need to be solid before you drop to that mode.
Pro Tip: Test your latency mode during a private stream before going public. Switch to ultra-low latency only after confirming your upload is rock solid with zero dropped frames.
Managing latency for interactive streams means selecting the right mode for your content type, not chasing the lowest number possible. A stable 10-second delay beats a choppy 4-second one every time.
What streaming workflows and tools work best for YouTube Live?
Three main workflows exist for YouTube Live: webcam streaming, mobile streaming, and encoder-based streaming. Each fits a different creator type.
Webcam streaming
Webcam streaming is the simplest option. You connect directly through YouTube Studio in your browser, pick your webcam, and go live. No extra software needed. This works well for talking-head content, podcasts, or quick announcements. The tradeoff is limited control. You get one camera angle, no scene switching, and no overlays.
Mobile streaming
The YouTube mobile app lets you go live directly from your phone. It's fast and portable, which makes it great for on-location content. The 50-subscriber requirement applies here, and the setup options are minimal compared to encoder workflows. For gaming or content that needs visual polish, mobile falls short.
Encoder-based streaming
Encoder software gives you full control. OBS Studio (free), Streamlabs, and vMix are the three most widely used options. With an encoder, you can:
- Capture gameplay from a capture card or screen
- Switch between multiple scenes (gameplay, facecam, BRB screen)
- Add animated overlays, alerts, and panels
- Control audio mixing with multiple sources
- Use plugins for chat integration and stream management
For gamers especially, encoder workflows are the standard. OBS handles the RTMPS connection to YouTube, manages your scenes, and lets you add a custom stream overlay without any coding. Streamlabs builds on OBS with a more beginner-friendly interface and built-in alert widgets.
Your internet connection matters more than your hardware in most cases. A stable upload of at least 5–6 Mbps handles 1080p streaming at standard bitrates. Wired ethernet beats Wi-Fi every time for upload consistency.